I’m inspired. How do I make my own mobile augmented reality art?
All of the works in this show are based on 3D models, so if you haven’t done so already, you’ll need to learn how to do 3D modelling. (If you’re already familiar with 3D modelling, skip over what follows and go down to the next section.)
To do this, the first thing you’ll need is a 3D modelling tool. And if you don’t have thousands of dollars to invest in top-of-the-line suites like Maya or 3DS Max, there are very good free tools you can download like Blender or Google SketchUp. They may seem daunting at first, but there are plenty of tutorials online that will help you get up to speed. (Try here for Blender, and here for SketchUp.) Alternatively, you could looking into enrolling in a 3D art course somewhere.
How can I make sure my creation works as a piece of mobile AR art?
Always be mindful that your work will be viewed on smartphones, and smartphones currently have nothing like the memory or processing power of present day desktop computers. If you’ve created a stunning 100,000 polygon artwork, people will walk around it and the phone will be forced to render it from different angles multiple times a second with images from the camera feed behind it – and that would probably crash just about any smartphone around at the moment.
As a rule, the platforms you can install your artwork on recommend works composed of no more than 5000 polygons. (if this sounds restrictive, remember you can do amazing things with even the lowest possible polygon count. The Butterfly Lovers, for instance, consists of a series of PNG files that have been applied as textures to basic two-sided planes.) In addition to polygon counts, there may also be restrictions on the type of texturing you can use, but we’ll get back to that later.
(Another consideration to bear in mind is the file size of your work. All the main mobile phone AR platforms download content in real time from the web, so any artwork that is too large may cause the download process to either timeout completely, or impose inordinate charges on your audience’s data plans.)
How do I actually get my AR artwork on to people’s phones?
Unless you intend to build your own AR application, you’re going to be delivering your work to people’s phones via an existing AR browser application. The one used in this show is the Layar Reality Browser, so we’ll focus specifically on that in this section.
The first step in getting an artwork on to Layar is getting it into the right format. Layar uses a proprietary 3D file format called l3d and has a tool to convert 3D models into that format that can be download here. In order to get models into this converter, they must be in Wavefront OBJ format. In addition to basic coloured materials, the converter supports textures, but only of the UV-mapped variety. (One cool thing it does do, though, is allow you to assign multiple UV textures to a model and animate them; effectively allowing you to create 3D augmented reality animated GIFs.)
There are other requirements and recommended approaches to preparing a work for delivery via Layar, but rather than run through all of them here, it’s probably best if you consult this Layar 3D content creation tutorial.
Once you have a Layar compatible artwork, the next step is to actually get it into a layer (that’s Layar’s term for a set of geo-located items that can be displayed on its platform). If you have a web development background and are comfortable building MySQL databases and writing PHP scripts, there are tutorials on the Layar site that will guide you through the process of setting up your layer back-end. (There is also a list of third party tools that can potentially make that process easier.)
You then you just need to create an account with Layar, log in and set up your layer. (There’s a tutorial on doing that here.) Once you’ve tested it thoroughly, you’ll need to submit it for approval, then there’ll be up to a week’s wait before you can finally publish it and have it appear on people’s phones.
If you DON’T have a geeky programming background, don’t despair. There are Layar Creation Tools out there with easy to use web interfaces that will take care of the esoteric behind-the-scenes work for you. Currently there are two that support layers with 3D models – buildAR or Hoppala.
Where else can I go with augmented reality art?
As I mentioned earlier, this show was set up to work on Layar but there are other platforms for delivering mobile augmented reality art; and other techniques for augmenting the world with your art that you may wish to explore.
The type of augmented reality delivered by Layar is location-based AR. It came to prominence in the last couple of years with the arrival on the market of smartphones with GPS, compasses and accelerometers. Prior to that, most of the focus in 3D model based AR was on markers – simple geometric shapes that could be “seen” by desktop webcams and processed in real time. Models were “placed on them” and tilted, moved and rotated as the marker was tilted, moved and rotated. (Here’s a simple example.)
In recent times, marker detection has become more sophisticated and now common images and 2D artworks can be used instead of markers. This technology is even making its way on to mobile phones. In the middle of last year, a mobile AR platform called junaio was launched with image recognition based 3D model placement. This is the platform used by Amir Baradaran in the work Frenchising Mona Lisa, and Lynette Wallworth in Rekindling Venus. (Layar is planning to add image recognition to its platform but no release date has yet been announced.)
Interesting developments are also happening around Unity, a game development platform that can be used to create iPhone and Android games. The companies Qualcomm and String have recently announced the release of plugins for Unity that will support image recognition based AR. This opens up the possibility of AR works that can incorporate highly sophisticated interactive animations, particularly when coupled with tablet devices with their larger memories and faster processors. (Here’s a couple of demos using Unity/String on an iPad 2 – demo 1, demo 2)
Mobile augmented reality as an art form is something that is still very much in its infancy, but the platforms and their capabilities are constantly expanding and evolving. Hopefully, this site has given you a taste of that, and you are inspired to go out and explore the possibilities and create…
How To “Virtually Deface” A Billboard Using Junaio
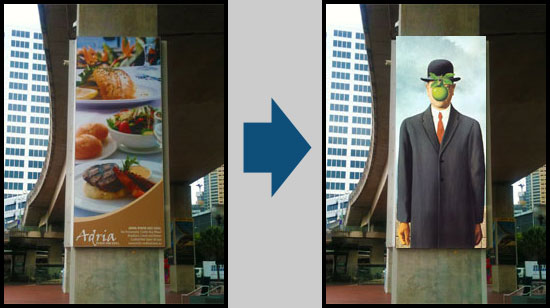
 The following is a simple example of image recognition AR inspired by the Augmented Reality Advertising Takeover in Times Square. It can be applied to most billboards you might encounter in the real world and uses junaio to virtually “replace” the billboard with an image of your choosing.
Unlike the preceding general discussion about Layar, no 3D modelling is required for this example, but you will need to have access to image manipulation software, like Photoshop or Gimp, and know how to use it.
Step 1: Choose Your “Target”
Obviously, you’ll need to find a billboard that the app can easily “recognise”; something that is high contrast, with different colours and sharp edges is recommended. Also, it needs to be an image that isn’t too “symmetrical” as the app needs to be able to distinguish left from right, and top from bottom so it can orient the “replacement image” correctly. Finally, you should avoid billboards covered in reflective glass or located in areas where nearby buildings, poles, etc might cast sharply defined shadows over their surfaces. This can create “false features” that might hamper recognition.
For more detailed guidelines on choosing your “target”, refer to this page in the documentation section of the junaio site.
Step 2: Take A Photo Of It
When doing this, make sure you are “front on” so the image appears as a relatively undistorted rectangle. (As mentioned above, try to avoid reflections and shadows that might create “false features”.) Once you have the photo, open it in your image editing software of choice, crop off any extraneous details not related to the billboard imagery, and resize the resulting image so it is no larger than 500kb.
Once again, refer to this page in the documentation section of the junaio site for more detailed guidelines on preparing your photo.
Step 3: Prepare The Replacement Image
The first things to bear in mind when preparing the “replacement image” that junaio will virtually superimpose over the billboard are that the replacement should have the same aspect ratio as the original (ie if the billboard is 4 x 3, the replacement image should also be 4 x 3) and, as with the photo in Step 2, it should be no more that 500kb in size.
Although we will be telling junaio to superimpose a 2D image over the billboard, we will need to supply it to the app as a 3D object. (This is because junaio will be tilting it in 3D “space” based on the distortion of image of the billboard as seen through the camera lens.)
Turning a 2D image into a 3D object is, however, easier than it sounds – all we need is a 2D plane in a 3D format recognised by junaio. This plane will then act as a “screen” that the image will be “projected” (or textured) on to. And we don’t even need to create this “screen” – the folks at junaio have already done this for us, and it can be downloaded from their 3D Models page. (The exact link is here.)

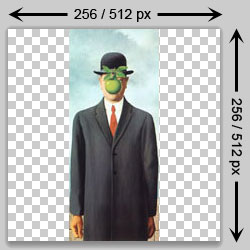
The “screen” supplied by junaio is a square, so any image you want to “project” on to it, needs to resized to fit within a square 256×256 or 512×512 PNG.
(To avoid the image being distorted, have transparent margins that fill the rest of the square as per the diagram on the left.)
Step 4: Create a junaio Developer Account & Channel
The rest of the steps in this example will now be completed online using the free junaio GLUE Channel Creator. To access it, you’ll first need to create a developer account on junaio. To create one of those, simply go to the Developer section of the junaio site; click on one of the Sign Up For Free! buttons; enter your name, city, country, email, a username & password; and click Sign Up.
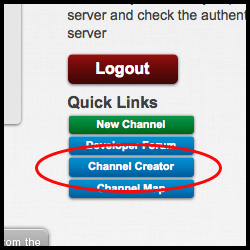
 Now, login and click on the Channel Creator button hidden in the right side bar.
(NB: A “channel” is the term used in junaio to define a collection of objects/assets displayed by the app in response to recognised images or pre-assigned geographical locations. It’s analogous to the term “layer” in Layar.)
You’ll be asked to login again. Once you have done this, click on the 1. Create new Glue Channel button; enter a name for your channel, a category (eg Culture), a region (ie part of the world you live); click on Create; and you are ready to do your virtual billboard defacement.
Step 5: Create a 3D Component & Upload Assets
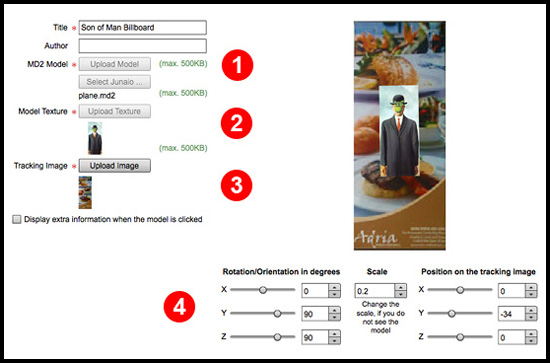
On the page that appears after you have created your channel, select the channel you just created and click on the 2. Add components (videos & 3d models) button. On the next page, click on the Add 3d model component and you should see a page that looks like this:

For MD2 Model (1), select the “screen” image plane downloaded from the junaio 3D Models page. For Model Texture (2), select the square PNG version of your replacement image. And, for Tracking Image (3), select your cropped/resized photo of the billboard.
On the right hand side of the web page, the billboard photo will appear with the replacement image screen “superimposed” over it. At first, the replacement image won’t appear because the starting orientation of the 3D image plane is perpendicular to the billboard photo. Try increasing the value of the Y slider in the Rotation/orientation in degrees controls (4). This will rotate the replacement image screen till it is finally “parallel” with the billboard photo – at a value of 90 – making it fully visible. Now adjust the other controls until the image is the right way up and completely covering the billboard photo. When you’re satisfied with the position, click Create. You are now ready to test your creation.
Step 6: Test, Tweak & Publish
You can test your channel straight away by simply clicking on the Test Channel link that you should see at the top of the Add Components page once you’ve finished Step 5. This will display your billboard photo on the web page. Now install the junaio app on your smartphone (if you haven’t done so already); open it and login in using the username & password of the developer account you created previously. Tap on the Favorites icon on the home screen of the app, then tap on the name of your channel to open it. Once the channel has finished loading, point the camera of your phone at the billboard photo on your computer. Your replacement image should appear on the phone screen, hovering over the billboard.
When you first do this, you may find that the replacement image actually appears larger, relative to the billboard photo, than it did on the 3D Component Creator web page. This is because, in the process of tilting the replacement image screen to make it visible, it was effectively “raised above” the billboard photo so it is “closer to the camera”. To offset this, go back into the 3D Component Creator web page and try decreasing the Z value in the Position on the tracking image controls. This will bring the replacement image screen “closer” to the billboard photo. (Before retesting on the phone, you’ll need to go into settings and turn Clear cache on.)
Once you are satisfied with your “billboard defacing” channel *, go to the My Channels section of the junaio Developer site, click on the Submit button. Wait about a week and your virtual billboard defacing channel should be approved & accessible to anyone with a junaio-equipped smartphone.
* : While you’re tweaking your channel, you might also want to add an icon that will appear next to its listing on the junaio app, along with a description of the channel for users of it.